
Introduction to Strawberry Kiss Cookies
The Charm of Homemade Cookies
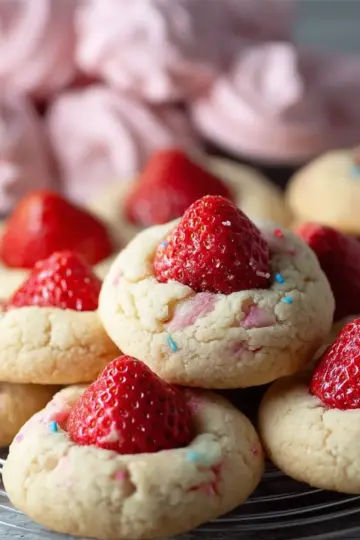
There’s something undeniably special about the warm aroma of freshly baked cookies wafting through your home. Homemade cookies offer a unique blend of comfort and creativity, making them perfect for any occasion—especially when sharing with loved ones. With just a few simple ingredients, you can create delights like Strawberry Kiss Cookies that are not only delicious but visually appealing as well. Their cheerful colors and delightful flavor are sure to brighten up your day or someone else's!
A Personal Story About Baking
Every time I think of baking, I’m reminded of my grandmother. She would spend hours in her cozy kitchen, whipping up treats that not only tasted heavenly but also filled the room with laughter and good memories. I often recall the joy I felt when helping her roll dough and pop chocolate kisses in the center of her cookies. Inspired by those nostalgic moments, I created my own twist: Strawberry Kiss Cookies. This recipe captures the same warmth and love, perfect for celebrations like Valentine’s Day or simply to brighten a Tuesday evening!
Ready to bring some joy into your kitchen? Let’s dive into the recipe and make your very own Strawberry Kiss Cookies!

Ingredients for Strawberry Kiss Cookies
Gathering the right ingredients is key to creating delightful Strawberry Kiss Cookies. Here’s what you’ll need to whip up this scrumptious treat:
- 16 oz Funfetti Sugar Cookie Mix: This mix not only saves time but adds a colorful and festive touch to your cookies.
- 4 oz Cream Cheese: Softened, a little cream cheese enhances the cookies’ texture, offering a subtle richness that balances the sweetness.
- 1 Large Egg: A vital binding agent, the egg helps everything come together perfectly.
- ½ cup Pink or White Sanding Sugar: This sugar adds a lovely crunch and colorful flair, making your cookies even more eye-catching.
- 18 Hershey’s Strawberry Ice Cream Cone Kisses: The pièce de résistance! These uniquely flavored kisses provide a burst of strawberry flavor that truly makes these cookies shine.
Make sure to grab these ingredients, and you’ll be on your way to baking some of the most delightful cookies you'll ever taste. For more baking tips, check out resources like the American Baking Association!
Step-by-step Preparation of Strawberry Kiss Cookies
Making Strawberry Kiss Cookies is a delightful and easy process, perfect for surprising friends or bringing a sweet treat to a gathering. Let’s walk through the preparation step by step, ensuring your cookies turn out as perfectly delicious as possible!
Gather your ingredients
Before you get started, it’s essential to have all your ingredients on hand. For this cheerful cookie recipe, you'll need:
- 16-ounce bag of Funfetti Sugar Cookie Mix
- 4 ounces of softened cream cheese (that’s half of an 8-ounce package!)
- 1 large egg
- ½ cup of pink or white sanding sugar or non-pareils
- 18 Hershey’s Strawberry Ice Cream Cone Kisses
Gathering everything first will keep your cooking experience smooth and enjoyable. Plus, who doesn’t love a colorful spread of ingredients?
Preheat the oven and prep the baking sheet
Now that you have everything ready, it’s time to get the oven preheating to 375°F (190°C). While that’s warming up, line your large baking sheet with some parchment paper. This will prevent the cookies from sticking and make clean-up a breeze. Just think about how satisfying it is to pull out perfectly baked cookies without any mess!
Mix the cookie dough
In a large mixing bowl, combine the Funfetti Sugar Cookie Mix, softened cream cheese, and the large egg. Using either a hand mixer or a stand mixer, beat until the ingredients are well-combined. You should end up with a soft and slightly sticky dough. If the dough feels unusually sticky and hard to work with, don’t worry! You can choose to refrigerate or freeze it for 30-60 minutes to make it more manageable.
Shape and coat the cookie balls
Once your dough is ready, it’s time to have some fun! Grab a 1 ½ tablespoon cookie scoop and begin to scoop out balls of dough. Drop these balls into a shallow bowl filled with your pink or white sanding sugar or non-pareils. Gently roll each ball until it’s fully coated, and then roll it into an even shape. This step not only makes your cookies look adorable but adds a delightful crunch to every bite.
Bake and finish with Strawberry Kisses
Place the cookie balls on your parchment-lined baking sheet, making sure to leave about 1 ½ inches of space between each one. Bake for 8-12 minutes or until the edges are set. Once baked, let the cookies cool on the baking sheet for about 3-5 minutes. This time allows them to firm up a bit. After that, it’s the most exciting part! Press an unwrapped Strawberry Kiss gently into the center of each cookie. The heat will melt the kiss just enough to create that perfect gooey, chocolatey topping. Finally, allow your cookies to cool completely on a wire rack or dive in while they’re still warm—no judgment here!
And there you have it—a delightful batch of Strawberry Kiss Cookies that are not only charming to look at but irresistibly tasty to enjoy. Happy baking!

Variations on Strawberry Kiss Cookies
Using Different Flavored Kisses
One of the best parts about Strawberry Kiss Cookies is their versatility! While the classic recipe calls for Strawberry Ice Cream Cone Kisses, you can experiment with a variety of flavors. Try replacing them with Hershey’s Mint, Caramel, or Peanut Butter Kisses to create different flavor profiles. Each variation delivers a unique twist, making these cookies perfect for any occasion.
Options for Gluten-Free Sugar Cookie Mix
Want to enjoy these delightful Strawberry Kiss Cookies but need a gluten-free alternative? No problem! Opt for a gluten-free sugar cookie mix, which you can find at most grocery stores or online. Just be sure to check the package for specific mixing instructions. This simple swap ensures that everyone can indulge in these delicious cookies without worry.
Feel free to mix and match these variations to make your cookies truly your own!
Cooking Tips and Notes for Strawberry Kiss Cookies
Tips for Handling Sticky Dough
When working with the dough for your Strawberry Kiss Cookies, it can get a bit sticky. Here’s a simple fix: if you find it hard to scoop, pop the dough in the refrigerator for 30–60 minutes. This slight chill makes it easier to handle and roll into perfect little balls. A light dusting of flour on your hands can also help!
How to Achieve the Perfect Bake
For perfectly baked cookies, keep an eye on the edges. They should be set but still soft in the middle. Bake in a preheated oven at 375°F for 8–12 minutes, and remember, they’ll continue to firm up while cooling. Try checking them around the 8-minute mark to prevent overbaking!
For more tips, check out this guide on cookie baking tips. Happy baking!

Serving Suggestions for Strawberry Kiss Cookies
Pairing with Drinks
When enjoying your Strawberry Kiss Cookies, consider pairing them with delightful beverages. A refreshing glass of sparkling lemonade, infused with fresh strawberries, complements the sweetness perfectly. Alternatively, a warm cup of coffee can balance the cookie's sugary flavors, creating a cozy treat for any afternoon moment. If you’re in the mood for something creamier, try a raspberry-flavored milkshake—it's sure to impress your friends and family!
Presentation Ideas for Special Occasions
These lovely Strawberry Kiss Cookies are not just tasty but also visually enticing, making them ideal for special celebrations. Arrange them on a decorative cake stand or tiered serving platter for a charming focal point. Wrapping each cookie in clear cellophane and tying it with a pretty ribbon can also make for delightful party favors! Don’t forget to sprinkle some extra sanding sugar around your display for a festive touch that adds to the cookie's charm.
Time Breakdown for Strawberry Kiss Cookies
Preparation Time
Making Strawberry Kiss Cookies is a breeze! You’ll need about 10 minutes to gather your ingredients and whip up the dough. Quick and simple, just the way we love it.
Baking Time
Once your dough is ready, pop those cookies in the oven. They will take about 8-12 minutes to bake, depending on your oven. Keep an eye on those golden edges!
Total Time
All in all, from start to finish, you're looking at around 48 minutes. This includes optional chill time if you need it. Perfect for a spontaneous baking session or those last-minute dessert cravings! For more easy dessert ideas, consider checking out Food Network for inspiration.
Nutritional Facts for Strawberry Kiss Cookies
Calories per cookie
Each Strawberry Kiss Cookie packs approximately 169 calories. Perfect for a sweet treat, but just enough to savor without overindulging. Whether you're sharing with friends or enjoying solo, these cookies are a delightful addition to your dessert table.
Breakdown of sugar and fat content
In every cookie, you'll find around 8 grams of sugar and 6 grams of fat, giving them that rich, decadent flavor we all love. The blend of cream cheese and the sweetness of strawberry kisses complements the cookie base beautifully. The balance of sugar and fat makes this treat both satisfying and delightful!
For more nutritional insights, you may want to check out resources from NutritionData or USDA's FoodData Central, where you can dive deeper into the health aspects of your favorite ingredients.
FAQs about Strawberry Kiss Cookies
Can I use regular sugar cookie mix instead?
Absolutely! If you don't have Funfetti Sugar Cookie Mix on hand, regular sugar cookie mix will work just fine. The key is to maintain that delicious softness and sweetness that makes Strawberry Kiss Cookies a hit. Just follow the same steps in the recipe, and you’ll still achieve delightful results.
How long do Strawberry Kiss Cookies stay fresh?
When stored in an airtight container at room temperature, Strawberry Kiss Cookies can last for about 3 to 5 days. If you want to keep them fresher for a longer period, consider refrigerating them, which can extend their shelf life by a week or two.
Can I freeze Strawberry Kiss Cookies?
Definitely! These cookies freeze remarkably well. Simply place them in a single layer on a baking sheet to freeze initially, then transfer to a freezer-friendly bag or container. You can enjoy freshly baked cookies anytime by thawing them in the refrigerator or at room temperature before serving.
For more tips on cookie storage, check out Food Network’s guide for fresh ideas!
Conclusion on Strawberry Kiss Cookies
In conclusion, Strawberry Kiss Cookies are a delightful way to celebrate sweet moments. Their crisp edges and gooey centers topped with chocolate make them irresistible. Perfect for any occasion, these cookies are not just easy to make but also add a fun touch to your dessert table! Enjoy baking!

Strawberry Kiss Cookies
Equipment
- oven
- mixing bowl
- hand mixer
- cookie scoop
- baking sheet
- parchment paper
Ingredients
- 16 oz Funfetti Sugar Cookie Mix
- 4 oz cream cheese softened, ½ 8-ounces package
- 1 large egg
- ½ cup pink or white sanding sugar or non-pareils
- 18 Hershey’s Strawberry Ice Cream Cone Kisses
Instructions
- Line a large baking sheet with parchment paper and preheat the oven to 375 degrees Fahrenheit.
- In a large mixing bowl, use a hand or stand mixer to beat together the cookie mix, cream cheese and large egg until combined. You should have a soft dough.
- Place the pink or white sanding sugar or non-pareils in a shallow bowl.
- Use a 1 ½ Tablespoon cookie scoop to scoop out balls of dough and drop them into the bowl of sugar or non-pareils.
- Roll them gently until coated and then roll into an even ball.
- The dough is sticky; if you cannot get it to scoop and roll well, you can refrigerate or freeze it for 30-60 minutes. It will still be slightly sticky but will be easier to work this way. This is optional.
- Place the cookie balls on the prepared baking sheet with about 1 ½ inches of space in between them.
- Bake for 8-12 minutes or until the edges are set.
- Allow the cookies to cool for 3-5 minutes on the cookie sheet and then press an unwrapped Strawberry Kiss into the top of each cookie.
- Move to a cooling rack to cool completely or serve warm.
Leave a Reply