
Introduction to Gluten Free Blueberry Pie
When it comes to dessert, many people think that gluten-free options are lacking in flavor or texture. But let me tell you — that's far from the truth! Gluten free desserts have earned a rightful place in kitchens everywhere, making it easier for everyone to enjoy delightful treats without the worry of gluten. With a few clever swaps, you can create mouthwatering desserts that satisfy your sweet tooth and leave everyone asking for seconds.
One such dessert is gluten free blueberry pie. This delightful summer treat is not just easy to make; it’s also bursting with juicy blueberries and wrapped in a homemade, flaky gluten-free crust. You might be wondering, "Can a gluten-free pie truly hold up against its traditional counterparts?" Absolutely! With the right ingredients and techniques, you’ll find that our recipe results in an appropriately textured pie that’s neither soupy nor runny.
Plus, summer is the perfect time to enjoy fresh blueberries, and this pie truly captures their natural sweetness. So gather your ingredients and get ready to impress your friends and family with a slice (or two) of this irresistible dessert! For tips on how to make your gluten free blueberry pie shine, keep reading!
Ingredients for Gluten Free Blueberry Pie
When it comes to creating a delightful gluten free blueberry pie, selecting the right ingredients is key to achieving that perfect blend of flavor and texture. Here’s a simple guide to what you’ll need.
Essential ingredients for the crust
To build a flaky, delicious pie crust, you'll need:
- 1 batch of gluten free pie crust (you can find a great recipe here) – This forms the foundation of your pie.
Fresh blueberries and sweeteners for the filling
The star of this pie is, of course, the filling! You’ll need:
- 6 cups fresh blueberries: Opt for ripe, juicy berries (approximately 3 pints).
- ½ cup white sugar: This adds sweetness without overpowering the natural berry flavor.
- ⅓ cup brown sugar: It gives a hint of caramel flavor.
- ¼ cup gluten free all-purpose baking flour: This helps thicken the filling.
- 3 tablespoons tapioca starch: Perfect for achieving that perfect consistency.
- 2 tablespoons lemon juice and 1 teaspoon lemon zest: These add brightness to the filling.
- 1 teaspoon vanilla extract: For an extra layer of flavor.
Optional ingredients to elevate your pie
Want to take your gluten free blueberry pie to the next level? Consider adding:
- Additional spices: Cinnamon or nutmeg can complement the blueberries beautifully.
- Sanding sugar: A sprinkle on top before baking gives a lovely crunch and shine.
With these ingredients in hand, you’re all set to create a stunning gluten free blueberry pie that will impress friends and family alike!
Preparing Gluten Free Blueberry Pie
Making a gluten free blueberry pie is not just an enjoyable kitchen project; it's a delicious way to celebrate summer's bounty. Follow these simple steps, and you’ll have a delightful dessert to wow your friends and family!
Step 1: Prepare the Gluten-Free Pie Crust
Start by whipping up a batch of your favorite gluten free pie crust. If you're looking for a fantastic, flaky recipe, check out my gluten-free pie crust tutorial. After mixing the ingredients, roll out your dough and gently press it into a pie dish. To pre-bake, pop it in the oven at 400°F for just 5 minutes. This helps create a firm base for your pie filling, making sure it doesn’t turn out soupy!
Step 2: Mix the Blueberry Filling
As your crust is par-baking, it's time to prepare the luscious blueberry filling. In a large mixing bowl, combine 6 cups of fresh blueberries (make sure to wash them!), ½ cup of white sugar, ⅓ cup of brown sugar, ¼ cup of gluten-free all-purpose flour, 3 tablespoons of tapioca starch, 2 tablespoons of lemon juice, 1 teaspoon of lemon zest, and 1 teaspoon of vanilla extract. Gently toss everything until the blueberries are evenly coated. This mixture creates a sweet, slightly tart filling that perfectly complements the flaky crust.
Step 3: Assemble the Pie with a Decorative Top
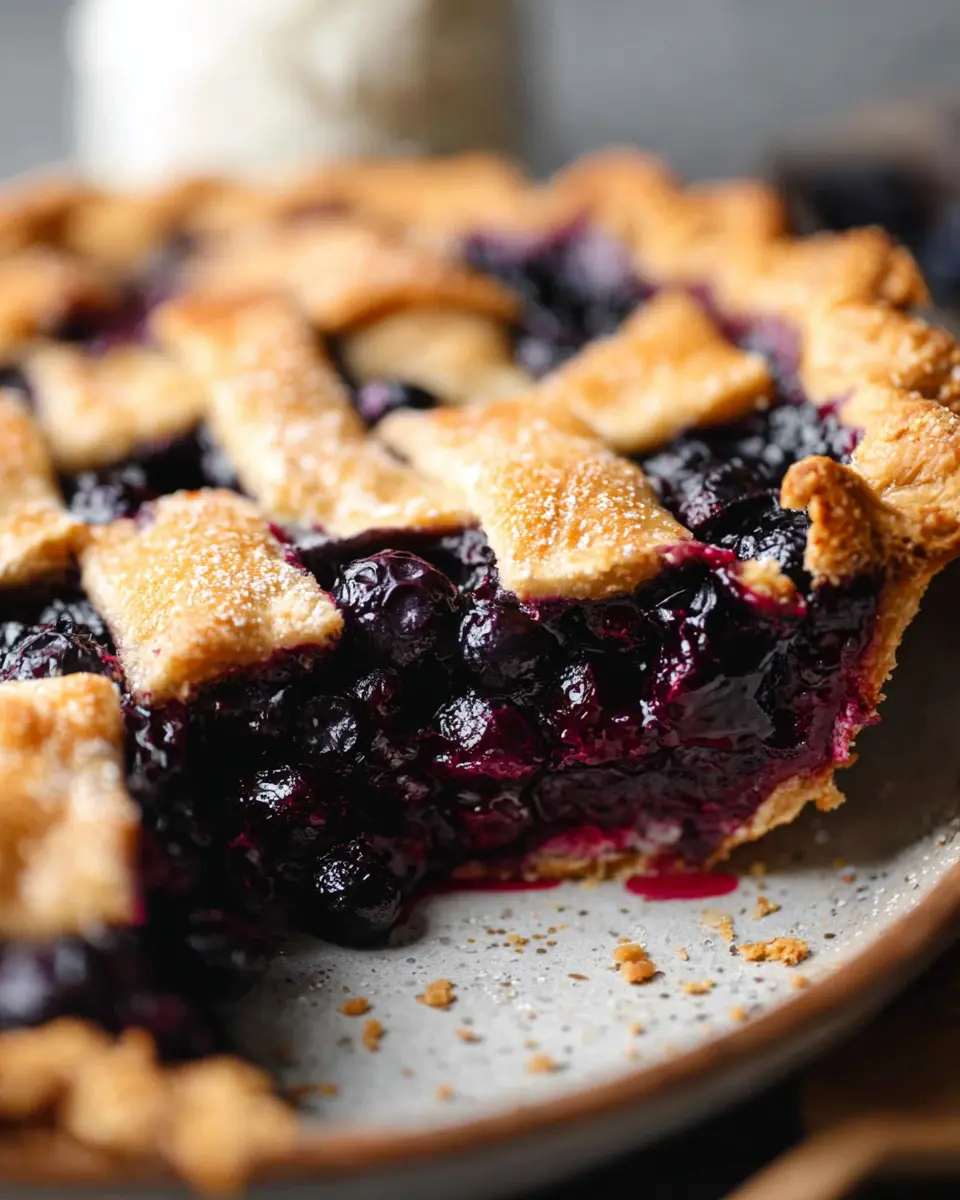
Once your filling is ready, it’s time to assemble your gluten free blueberry pie. Pour the filling into the par-baked crust, spreading it out evenly. Now, roll out the remaining portion of your dough. You can either lay a full crust over the top and crimp the edges or try your hand at a lattice design. If you opt for the lattice, cut strips of dough about 1 inch wide and weave them over the filling. For a visual guide, check out this great lattice pie crust tutorial. Don’t forget to brush the top with an egg wash and sprinkle sugar for a delicious crunch!
Step 4: Bake the Pie to Perfection
Bake your assembled pie in the preheated oven at 400°F for 25 minutes; then reduce the temperature to 370°F and continue baking for another 45-50 minutes. To prevent over-browning, consider covering the edges with foil during the last half of baking if they start to darken too quickly. The goal is to ensure the filling is bubbling and the crust is golden brown.
Step 5: Cool and Slice the Pie
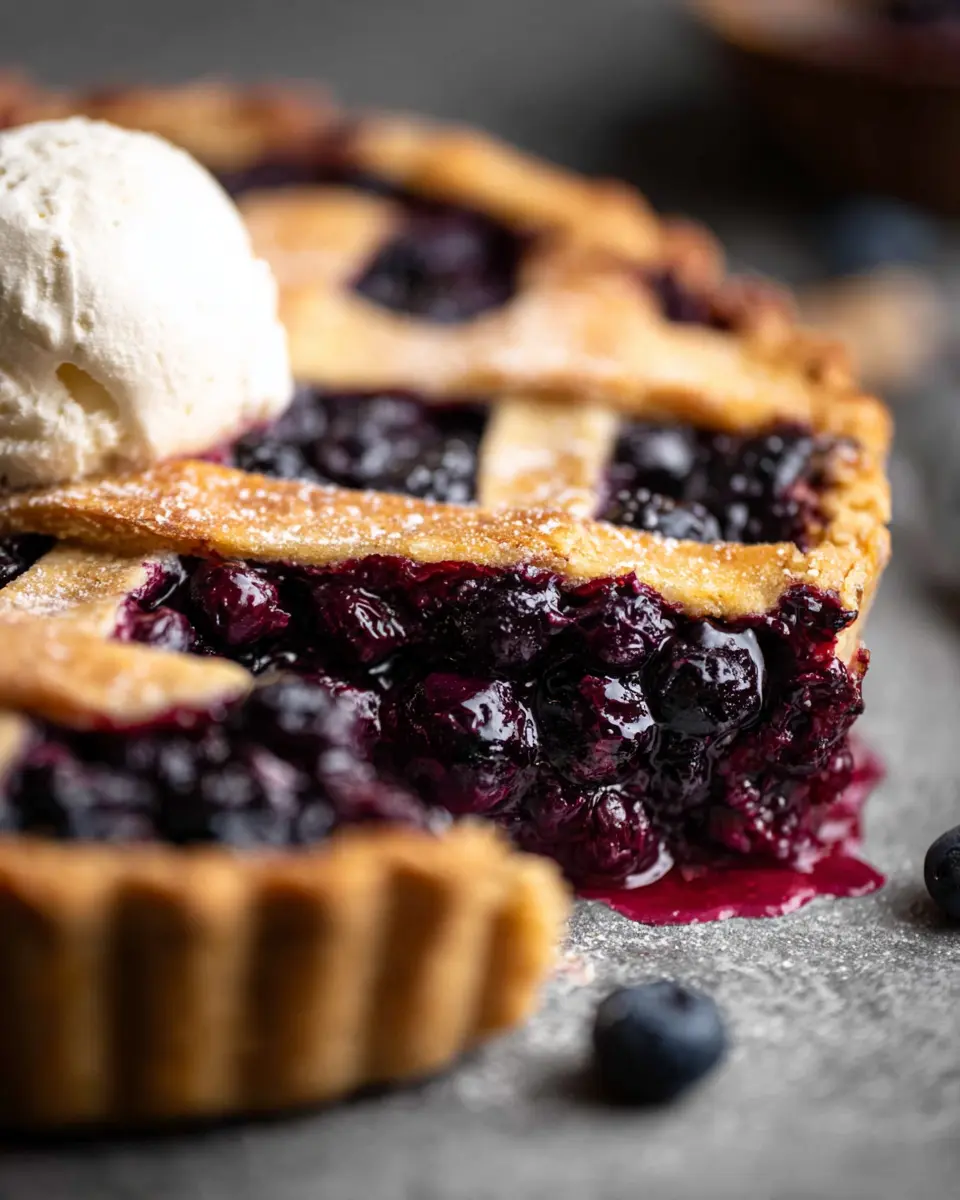
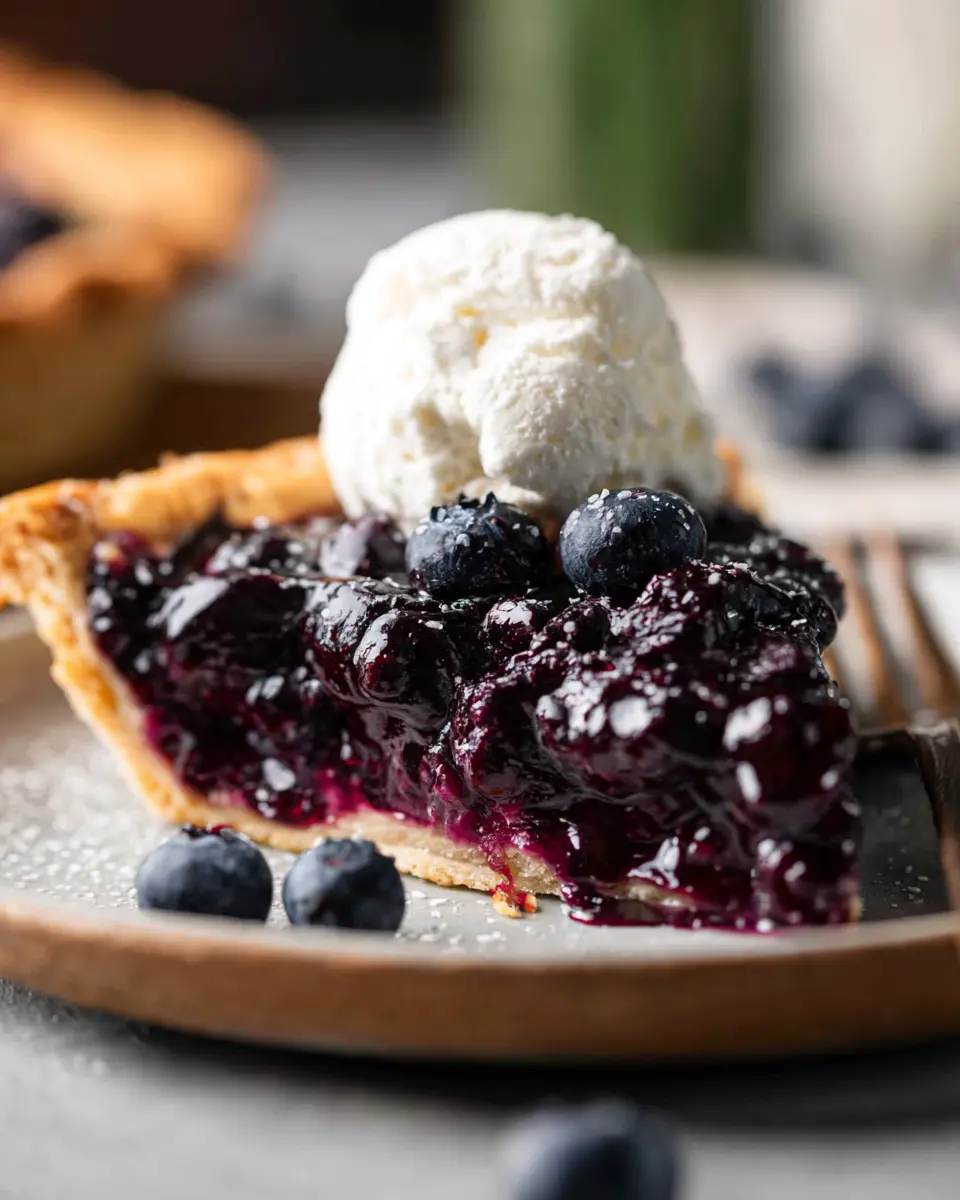
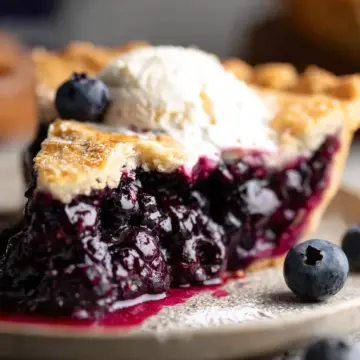
After pulling the pie from the oven, it’s important to let it cool completely on a wire rack. Give it at least 4 hours to set. Trust me, slicing too soon can lead to a messy situation with runny filling. Once it’s cooled, slice it up and serve as is, or elevate it with a scoop of vanilla ice cream! Enjoy every bite of your homemade gluten free blueberry pie!
With a little patience and love, you’ll create a pie that’s sure to impress. Happy baking!
Variations on Gluten Free Blueberry Pie
Blueberry Pie with a Crumb Topping
If you prefer a little crunch with your gluten free blueberry pie, consider adding a delicious crumb topping. Simply mix together gluten-free flour, oats, brown sugar, and softened butter until a crumbly texture forms. Sprinkle this on top of your pie before baking. The result? A sweet and satisfying contrast to the juicy blueberries!
Mixed Berry Gluten-Free Pie Option
Why stick to just blueberries? Create a delightful mixed berry pie by combining blueberries with raspberries, strawberries, or blackberries. This medley of flavors not only enhances the taste but also adds a beautiful burst of color. Your guests will love this vibrant twist on a classic favorite!
Adding Lemon or Cinnamon for a Twist
Want to elevate your gluten free blueberry pie further? Add a hint of lemon zest or a sprinkle of cinnamon to the filling. The lemon will brighten the flavor profile, while the cinnamon brings warmth and aromatic richness. Each bite will transport you to summer picnics and cozy gatherings.
Feel free to experiment with these variations—after all, baking is all about being creative and having fun!
Cooking tips and notes for Gluten Free Blueberry Pie
Common pitfalls and how to avoid them
When making your gluten free blueberry pie, the key is to avoid watery filling. Using fresh blueberries is essential; frozen can lead to excess moisture. Also, don’t skimp on baking time! Undercooking can result in a soupy pie. Let it cool completely before slicing, as this helps the filling set.
Tips for perfecting the crust and filling
To achieve a flaky crust, ensure your butter is cold, and don’t overwork the dough. Chilling your ingredients can make a significant difference. For the filling, balance the sweetness with lemon juice and zest, enhancing the blueberry flavor. Use this gluten free pie crust guide for extra assistance. Happy baking!
Serving suggestions for Gluten Free Blueberry Pie
Enjoying the pie warm or chilled
There's something magical about a gluten free blueberry pie, whether you savor it warm right out of the oven or chilled after a few hours in the fridge. If you prefer a cozy experience, serve it warm with a scoop of vanilla ice cream melting into the juicy blueberries. For a refreshing twist, let it chill thoroughly and enjoy it cool. Both ways highlight the pie’s delightful flavors, so don’t hesitate to try both!
Pairing ideas for a delightful dessert experience
To elevate your dessert experience, consider these pairing ideas:
- Fresh Whipped Cream: A dollop of freshly whipped cream adds just the right amount of sweetness and can bring out the blueberry flavor.
- Classic Vanilla Ice Cream: This timeless combination never goes out of style and creates a delicious contrast with the warm pie.
- Greek Yogurt: For a healthier touch, serve with a spoonful of plain or flavored Greek yogurt. It’s creamy, tangy, and complements the blueberries beautifully.
- Herbal Tea or Coffee: Enjoy a warm cup alongside your pie to balance the sweetness. Matcha or chamomile tea works well, as does a rich cup of coffee.
Whichever way you choose to serve your gluten free blueberry pie, each bite will be a delightful treat!
Time Breakdown for Gluten Free Blueberry Pie
Preparation Time
Get your kitchen ready! The preparation time for this delicious gluten free blueberry pie takes about 1 hour. This includes making the crust and preparing the filling. Make sure to have everything on hand for a smooth process!
Cooking Time
Once your pie is assembled, the cooking time is around 1 hour and 15 minutes. You’ll start baking at a high temperature for the first part, then lower it to ensure perfectly cooked blueberries without a soggy crust.
Total Time
In total, allow 6 hours and 15 minutes for the entire process. This includes chilling time, which is crucial for a beautifully set filling. It might seem long, but trust me, it’s well worth the wait for this mouthwatering gluten free blueberry pie!
Nutritional Facts for Gluten Free Blueberry Pie
Calories Per Slice
Each slice of this gluten free blueberry pie clocks in at about 253 calories. This makes it a delightful dessert option that won't derail your daily nutrition.
Key Nutritional Components
Beyond the delightful taste, this pie offers some nutritional benefits:
- Carbohydrates: 38g
- Protein: 1g
- Fat: 1g
- Fiber: 3g
- Sugar: 29g
Blueberries are high in antioxidants and contribute to the overall healthfulness of this recipe. If you’re curious about the health benefits of blueberries, check out this link. Enjoy this sweet treat knowing it has some nutritional value too!
FAQs about Gluten Free Blueberry Pie
What can I use instead of regular flour?
If you're on a gluten-free diet, using a high-quality gluten-free all-purpose flour blend is your best bet. This blend typically contains a mix of rice flour, tapioca starch, and xanthan gum, which can replicate the texture of wheat flour. Feel free to check out recommendations from Bob’s Red Mill or Better Batter for reliable options.
Can I freeze gluten-free blueberry pie?
Absolutely! Freezing your gluten free blueberry pie can be a great way to enjoy it later. Just make sure to wrap it tightly in plastic wrap and then in aluminum foil. When you're ready to dig in, allow it to thaw in the refrigerator overnight for the best results.
How can I ensure my pie filling isn’t runny?
To avoid a runny filling, it's essential to use the right thickening agents. Both tapioca starch and gluten-free all-purpose flour work wonderfully to absorb excess moisture. Also, let your pie cool completely before slicing; this will help the filling set up nicely. Happy baking!
Conclusion on Gluten Free Blueberry Pie
Celebrating homemade goodness with gluten-free delights
There’s something truly special about a gluten free blueberry pie. It’s not just a dessert; it’s a celebration of flavors and textures that everyone can enjoy. By choosing fresh ingredients and a solid recipe, you’re crafting a memorable experience perfect for summer gatherings. Share this delightful dish with friends and family, and watch them fall in love with every slice!
Gluten Free Blueberry Pie
Equipment
- oven
- mixing bowl
- pie dish
- whisk
Ingredients
Pie Crust
- 1 batch gluten free pie crust click for recipe
Filling
- 6 cups fresh blueberries 3 pints
- 0.5 cup white sugar
- 0.33 cup brown sugar
- 0.25 cup gluten free all purpose baking flour
- 3 tablespoons tapioca starch
- 2 tablespoons lemon juice
- 1 teaspoon lemon zest
- 1 teaspoon vanilla extract
- 1 egg for egg wash
Instructions
Preparation
- Prep the pie crust according to the instructions. Par-bake the bottom for just 5 minutes.
- Preheat the oven to 400 Fahrenheit.
- Combine all ingredients for the filling (leaving aside the egg for the wash) and mix well to combine.
- Transfer the filling to the crust and spread evenly.
- Roll out the rest of the dough from the pie crust recipe for the top. Cut strips for a lattice top or place the crust on top as is.
- Whisk the egg in a small dish and lightly brush on top. Optional: sprinkle with sanding sugar.
- Bake at 400 for 25 minutes, then reduce to 370 Fahrenheit and bake for an additional 45-50 minutes.
- Remove from the oven and let cool on a wire rack. Let cool for at least 4 hours before slicing.
- Slice and serve as is or with vanilla ice cream.


Leave a Reply